Pepperoni Cheese Crisps
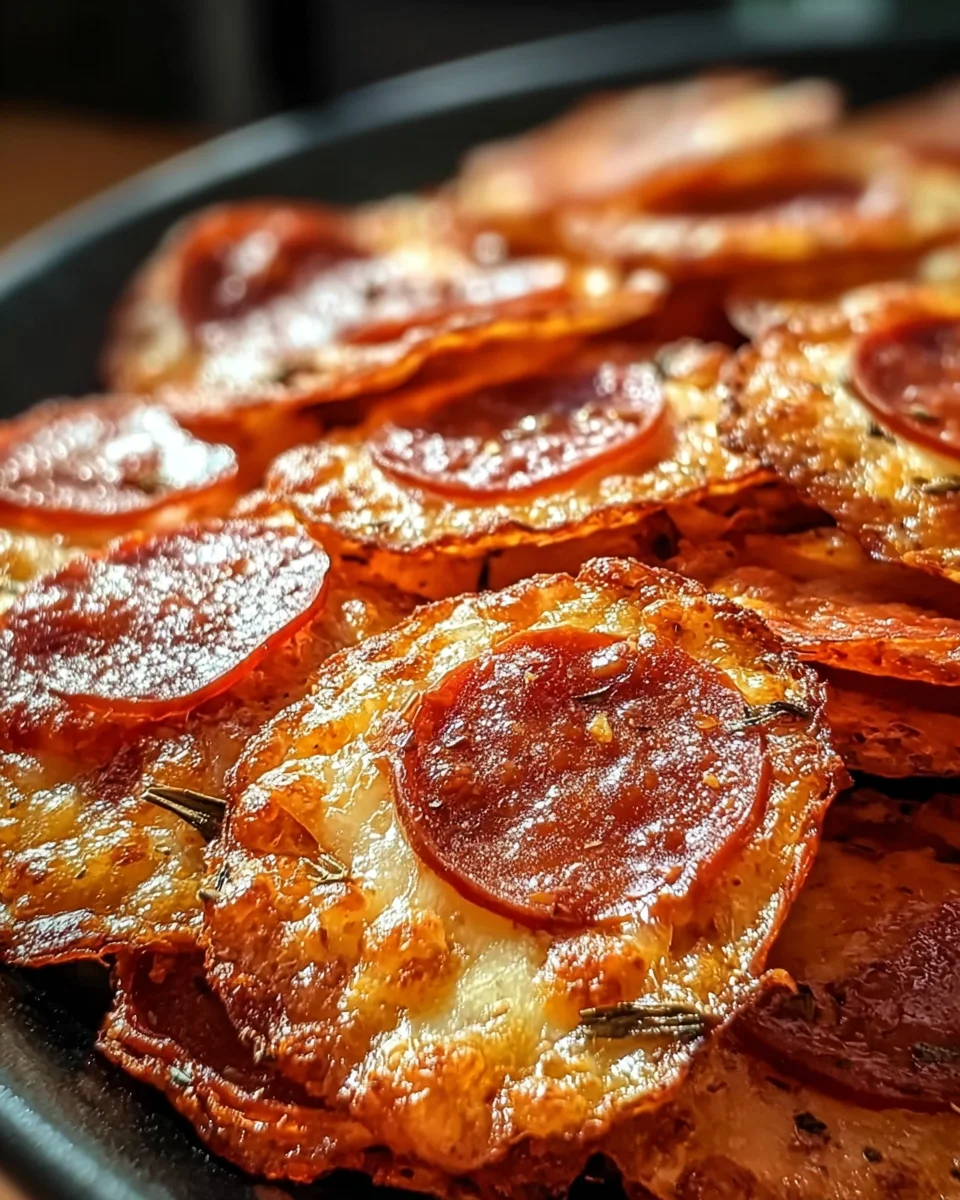
Quick and easy Pepperoni Cheese Crisps are the ultimate low-carb snack, perfect for any occasion. These crispy delights combine the savory goodness of pepperoni with a blend of cheddar and mozzarella cheese, creating a satisfying treat that’s gluten-free and keto-friendly. Whether you need a game-day snack or a quick appetizer for a gathering, these cheese crisps will surely impress.
Why You’ll Love This Recipe
- Crispy Texture: The combination of melted cheese and pepperoni creates a delightful crunch that satisfies your cravings.
- Low-Carb Delight: Perfect for those following a keto diet, these crisps keep your carb intake in check while delivering great flavor.
- Quick to Make: With just 5 minutes of prep and 8 minutes of baking, you can whip up a batch in no time.
- Versatile Snack: Enjoy them on their own or pair with your favorite dips for an extra kick.
- Gluten-Free Option: Made with simple ingredients, these cheese crisps cater to gluten-free diets without sacrificing taste.
Tools and Preparation
To create your Pepperoni Cheese Crisps, having the right tools makes the process smoother. Here’s what you’ll need:
Grab This Chef Knife Now - Almost Gone!
- Stays Razor-Sharp: Ice-hardened blade keeps its edge longer than ordinary knives
- Superior Grip Control: Unique finger hole design gives you perfect balance and safety
- Built to Last a Lifetime: Premium stainless steel blade with elegant beech wood handle
Customer Reviews ★★★★★
Essential Tools and Equipment
- Non-stick muffin tin
- Grater
- Oven
Importance of Each Tool
- Non-stick muffin tin: Ensures easy removal of the crisps without sticking, giving you perfectly shaped snacks every time.
- Grater: Allows you to quickly shred cheese for even melting and better texture in your crisps.
- Oven: Provides consistent heat for baking, ensuring your cheese crisps cook evenly and achieve that desired crispiness.
Ingredients
Cheese Blend
- 1/3 cup grated cheddar cheese
- 1/3 cup grated mozzarella cheese
Pepperoni Base
- 12 slices pizza pepperoni
How to Make Pepperoni Cheese Crisps
Step 1: Preheat the Oven
Heat your oven to 375°F (190°C) so it’s ready for baking.
Step 2: Prepare the Muffin Tin
Place the pepperoni slices in each cup of the non-stick muffin tin. Arrange them so they form a little bowl shape.
Step 3: Add the Cheese Mix
Combine the cheddar and mozzarella cheeses in a bowl. Evenly divide this mixture over each pepperoni slice, pressing it down flat to ensure it melts well.
Step 4: Bake Until Crispy
Bake in the preheated oven for about 8 minutes or until the edges are crispy and brown.
Step 5: Cool Before Serving
Allow the crisps to cool in the muffin tin for about 5 minutes before gently removing them. This helps them firm up and makes handling easier.
Enjoy your homemade Pepperoni Cheese Crisps as a delightful snack or appetizer!
How to Serve Pepperoni Cheese Crisps
Pepperoni cheese crisps are a versatile snack that can be enjoyed in various ways. Whether you’re hosting a party or looking for a quick bite, these crisps can complement different flavors and dishes.
Pair with Dips
- Marinara Sauce: A classic choice, marinara adds a zesty touch to the savory flavors of the crisps.
- Ranch Dressing: Creamy ranch pairs perfectly with the crunch of the cheese crisps for a satisfying contrast.
- Guacamole: The creamy texture of guacamole balances the crispiness, making it an excellent dip option.
Serve as Appetizers
- Charcuterie Board: Add these crisps to your charcuterie board alongside meats and cheeses for a delightful snacking experience.
- Game Day Snacks: Perfect for watching sports, serve them on a platter with other finger foods to keep guests satisfied.
- Cocktail Hour Treats: These crisps make an easy yet elegant addition to cocktail hour, impressing your guests effortlessly.
Add to Salads
- Caesar Salad Topper: Crumble them over a Caesar salad for added texture and flavor that enhances every bite.
- Mixed Greens Salad: Toss them into a mixed greens salad for an unexpected crunch that elevates your dish.

How to Perfect Pepperoni Cheese Crisps
To achieve the best results with your pepperoni cheese crisps, consider these helpful tips. They will ensure your snacks come out crispy and flavorful every time.
- Use Fresh Cheese: Freshly grated cheese melts better and provides superior flavor compared to pre-packaged options.
- Preheat Your Oven: Always start with a preheated oven at 375°F (190°C) to ensure even cooking and crispiness.
- Don’t Overcrowd the Muffin Tin: Leave enough space between pepperoni slices for optimal airflow, which helps them crisp up nicely.
- Watch the Baking Time: Keep an eye on them as they bake; removing them at the right moment prevents burnt edges while achieving perfect crispness.
- Cool Before Serving: Allowing the crisps to cool in the muffin tin helps them firm up for better texture when removed.
Best Side Dishes for Pepperoni Cheese Crisps
Pairing side dishes with pepperoni cheese crisps enhances your snack experience. Here are some delicious options that complement their flavors beautifully.
- Fresh Veggies: Crisp vegetables like celery and carrots provide a refreshing contrast to the rich taste of cheese crisps.
- Olives: A mix of green and black olives adds briny notes that work well with the savory flavors of the crisps.
- Stuffed Peppers: Mini stuffed peppers filled with cream cheese offer creamy bites that balance out the crunchiness.
- Cheese Platter: Combine different cheeses such as gouda or brie alongside your crisps for an indulgent treat.
- Spicy Nuts: A bowl of spicy roasted nuts can add heat and texture, making snacking even more exciting.
- Caprese Skewers: Skewers of mozzarella, tomatoes, and basil create fresh flavor bursts that pair wonderfully with cheesy snacks.
Common Mistakes to Avoid
Making Pepperoni Cheese Crisps is simple, but a few common mistakes can affect your results.
- Not using a non-stick muffin tin – This can cause your crisps to stick. Always ensure you use a non-stick tin or line it with parchment paper.
- Overcrowding the tin – If you place too many pepperoni slices in one cup, they won’t cook evenly. Stick to one slice per cup for the best results.
- Not pressing the cheese down – Skipping this step can lead to uneven cooking. Make sure to press the cheese mixture flat over the pepperoni for uniformity.
- Ignoring the cooling time – Removing the crisps too soon can result in breakage. Allow them to cool for at least five minutes before taking them out of the tin.
- Baking at incorrect temperatures – Ensure your oven is preheated to 375°F (190°C). Incorrect temperatures can cause undercooked or burnt crisps.

Storage & Reheating Instructions
Refrigerator Storage
- Store leftover Pepperoni Cheese Crisps in an airtight container.
- Keep them in the refrigerator for up to 3 days.
Freezing Pepperoni Cheese Crisps
- Place cooled crisps in a single layer on a baking sheet.
- Freeze until solid, then transfer them to a freezer-safe bag for up to 2 months.
Reheating Pepperoni Cheese Crisps
- Oven – Preheat the oven to 350°F (175°C) and bake for about 5 minutes until crispy again.
- Microwave – Heat on a microwave-safe plate for 15-20 seconds. Note that they may not stay crispy.
- Stovetop – Place them in a skillet over medium heat for about 2-3 minutes, flipping occasionally.
Frequently Asked Questions
If you have questions about making Pepperoni Cheese Crisps, you’re not alone! Here are some common queries answered.
Can I use different types of cheese for Pepperoni Cheese Crisps?
Absolutely! Feel free to experiment with other cheeses like gouda or parmesan for different flavors.
How do I make these Pepperoni Cheese Crisps spicy?
Add crushed red pepper flakes or jalapeño slices on top of the cheese before baking for extra heat.
Are Pepperoni Cheese Crisps suitable for gluten-free diets?
Yes, these crisps are naturally gluten-free since they contain no flour or gluten ingredients.
How can I customize my Pepperoni Cheese Crisps?
Try adding herbs like oregano or basil, or even sprinkle some garlic powder into the cheese mix for added flavor.
Final Thoughts
Pepperoni Cheese Crisps are an easy and delightful snack that fits perfectly into low-carb diets. Their crispy texture and cheesy goodness make them irresistible. Plus, customization options abound—feel free to add your favorite spices or alternative toppings. Try this recipe today and enjoy a satisfying treat!

Pepperoni Cheese Crisps
- Prep Time: 5 minutes
- Cook Time: 8 minutes
- Total Time: 13 minutes
- Yield: Approximately 12 servings 1x
- Category: Appetizer
- Method: Baking
- Cuisine: American
Description
Pepperoni Cheese Crisps are the perfect quick and easy snack that satisfies your cravings without derailing your low-carb diet. These delightful bites combine the savory flavor of pepperoni with a cheesy blend of cheddar and mozzarella, creating a crunchy treat that’s gluten-free and keto-friendly. Ready in just 13 minutes, they make an excellent appetizer for gatherings or a game-day snack that will impress your guests. Whether enjoyed on their own or paired with dips like marinara or ranch, these crisps are sure to be a hit.
Ingredients
- 1/3 cup grated cheddar cheese
- 1/3 cup grated mozzarella cheese
- 12 slices of pizza pepperoni
Instructions
- Preheat your oven to 375°F (190°C).
- Arrange pepperoni slices in each cup of a non-stick muffin tin to form bowls.
- Mix cheddar and mozzarella cheese in a bowl, then divide evenly over the pepperoni, pressing down gently.
- Bake for about 8 minutes or until the edges are crispy.
- Cool for 5 minutes before removing from the tin.
Nutrition
- Serving Size: 1 serving
- Calories: 90
- Sugar: 0g
- Sodium: 250mg
- Fat: 7g
- Saturated Fat: 3g
- Unsaturated Fat: 4g
- Trans Fat: 0g
- Carbohydrates: 1g
- Fiber: 0g
- Protein: 6g
- Cholesterol: 20mg

